Wie bearbeite ich meine Fotos? | How do I edit my pictures?
Guten Abend allerseits,
heute mal ein etwas anderes Thema, was vielleicht den einen oder anderen interessieren könnte. Wenn es euch interessiert wie ich meine Bilder bearbeite, welche Apps ich dafür nutze und wieviel Aufwand das beinhaltet, lest gerne weiter!
Good evening to all of you,
today i'm going to talk about another topic, which may still be interesting for some of you.
If you are interested in how I edit my pictures, which apps i use or how much effort this takes, just keep on reading!
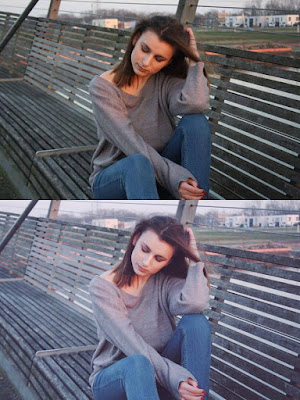
Zunächst habe ich mir ein Beispielbild ausgesucht, welches noch komplett unbearbeitet ist. Die erste App, die ich nutze ist ''PhotoshopFix'' die gibt's gratis für IOS und Android und für mich reicht sie vollkommen um ein paar Unreinheiten auszubessern.
At first I took a picture as example, which is still unedited. The first app i'm using is ''PhotoshopFix'', which is an app you can get for free for IOS as well as Android. This one is absolutely enough for me when it comes to only retouching a few blemishes.
Unter dem Aspekt ''Reparatur'' benutze ich zunächst das Tool ''Flecken beheben'', da ich in meinem Gesicht ehrlicherweise Muttermale habe, die mich persönlich stören. Diese bessere ich aus aber da meist ein unschöner Fleck an der Stelle bleibt benutze ich das Tool ''ausbessern'', welches direkt nebenan liegt und führe meinen Finger über eine Hautstelle, die der retuschierten Hautfarbe ähnelt, idealerweise in der Nähe der bearbeiteten Stelle.
Beginning with the aspect ''repair'' i'm using the tool ''fix stains'', because I have some birthmarks around my mouth i honestly doesn't like. I fix them but since there remain some unpleasant marks i continue by using ''correct'',which is right next to the other tool. Then i guide my finger over a skin spot that matches the skincolor on the spot i retouched, which is often near the edited spot.
Wenn ich damit fertig bin gehe ich in die nächste Kategorie ''Glätten'', um mein Gesicht ebenmäßiger erscheinen zu lassen. Die Funktion ''Glätten'' nutze ich zunächst auf meinem ganzen Gesicht, was das im ersten Moment puppenhaft, für mich persönlich sogar zu puppenhaft aussehen lässt.
Danach gehe ich mit dem Tool ''Bildschärfe'' noch einmal abgeschwächt darüber, um etwas Natürlichkeit wieder zu erlangen. Dabei gehe ich hauptsächlich über die Augen- und Nasenpartie.
Afterwards i go over to the tool ''sharpening'' and lightly use it on my eyes and nose.
Das wars auch schon mit PhotoshopFix. Ich mache dann weiter mit ''VSCO'', definitiv einer meiner Lieblingsapps! Als erstes importiere ich die Datei, die ich bearbeiten möchte und bearbeite einfach drauf los. VSCO hat eine große Auswahl an verschiedenen Filtern, die ich dann nach Lust und Laune einfach mal ausprobiere. Ich würde sagen es kommt meistens auf das Bild an, welchen Filter ich nehme aber hauptsächlich halte ich mich an Rosatöne, weil sie mir einfach am besten gefallen. Als Basis nehme ich am liebsten den Filter F2 in abgeschwächter Form.
That's it for PhotoshopFix. I continue with ''VSCO'', definitely one of my favorites when it comes to editing pictures! First i import the file i want to edit and just go for it. VSCO has a huge selection of different filters which i just try out depending on my mood and the picture of course but mainly i choose pinktones because they are the best for my liking. As base i take the filter F2 most of the time in an attenuated form.
Danach begebe ich mich an die manuelle Bearbeitung beginnend mit der Belichtung. Da mag ich es persönlich etwas heller aber dafür spare ich dann am Kontrast. Danach verringere ich die Sättigung minimal aber glaubt mir, das macht schon einen Unterschied. Die Temperatur kühle ich danach noch ab und den Farbregler schiebe ich dann nach rechts um wieder mehr rosa und weniger blau in das Bild zu kriegen. Die Schattenfarbe wird dann noch lila ebenso wie die Lichtfarbe und das war's im Endeffekt. Nurnoch in der gewünschten Größe abspeichern und fertig ist das Bild.
Afterwards i start the manual edit starting with the exposure. I personally like it a bit lighter but therefore i save up some contrast. After that I reduce the image saturation just a tiny bit but still, it makes a difference. I cool down the temperature and push the color controls to the right to get a little bit more of a pink and less of a blue undertone into the picture.I change the color of the shadow as well as the color of the light to purple and that's basically it. As the last step I save it up in the size i need it and there you go.


Ich hoffe euch hat der kleine Einblick in meine Bildbearbeitungsroutine gefallen und ich würde mich freuen ein paar Bilder zu sehen, die vielleicht so ähnlich bearbeitet wurden. Bis demnächst!
I hope you enjoyed this little insight into my editing routine and i would be glad to see some pictures that might have been edited similar.
Until next time!


Kommentare
Kommentar veröffentlichen